
Brief Overview of the Export Your Hotmail Emails
Are you looking to save or back up your Hotmail emails? Whether you’re switching to a new email provider or just want to keep your important messages safe, exporting your emails is a smart move. In this simple guide, we’ll walk you through the process of exporting your Hotmail emails in a conversational and easy-to-follow way.
SEE ALSO: How to Mark All Your Gmail Messages as Read
Table of Contents
1. Log into your Hotmail account
You must first log into your Hotmail account in order to begin. Go to outlook.live.com, the official Hotmail website, and enter your password and email address.

2. Access Your Inbox
You will see yourself in your Hotmail inbox once you have logged in. This is the location of all of your emails.

3. Choose Which Emails to Export
Select the emails that you wish to export. You can choose specific emails or whole folders. Holding down the “Ctrl” key on your keyboard while clicking on each email will select numerous emails. Click on the folder name to view the complete folder.
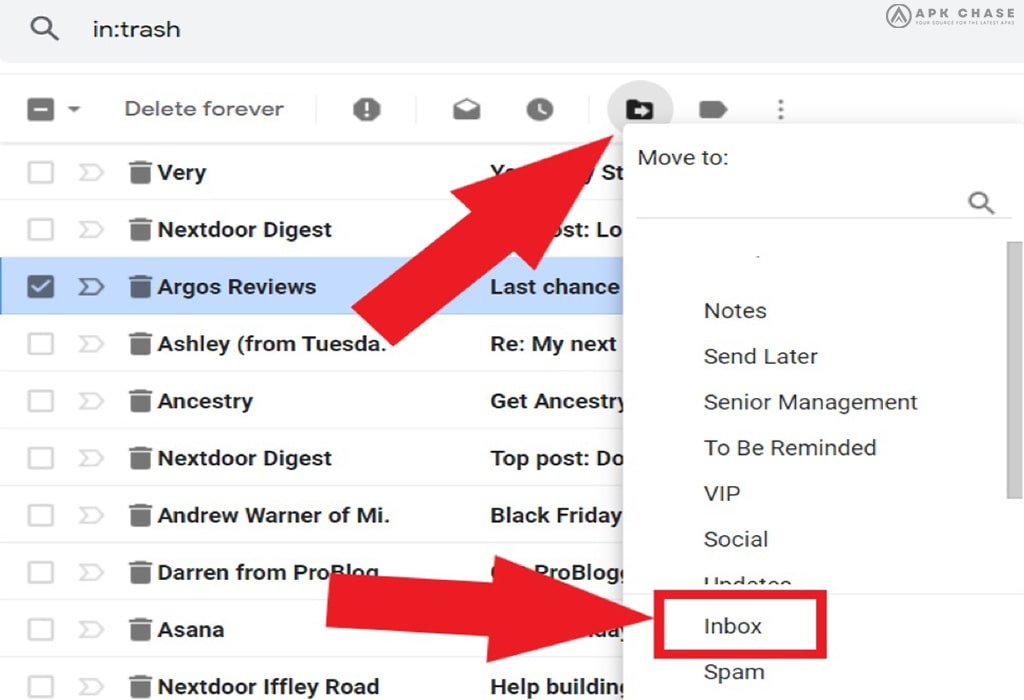
4. Select “Move to”
Look for the “Move to” option in the toolbar at the top of the page after choosing your emails or folder. Tap it to reveal a drop-down menu.

5. “New Folder”
Choose “New folder” from the “Move to” menu. By doing this, you’ll be able to make a new folder to hold your exported emails.
6. Give Your New Folder a Name
You will be prompted to name your new folder in a pop-up box that appears. Consider titling it “Exported Emails” to make it easier to find.

7. Transfer emails to the new folder
Click “Move” after naming your newly created folder. The chosen emails or folder will be moved into the freshly made folder as a result.
8. Activate Your New Folder
Now, navigate to the left sidebar of your inbox and you should be able to see the newly formed folder. To open it, click on it.

9. Email Downloads
You’ll discover all the emails you moved in your new folder. Click the “Download” button after choosing the emails you wish to download (you can choose to export every email to preserve everything). Your chosen emails will be compressed by Hotmail into a zip file, which will then begin to download.

10. Zip File Saving
On your computer, select a location for the zip file containing your emails to be saved. After deciding on a location, press “Save.”
11. Retrieve Your Emails
On your PC, find the zip file and give it a right-click. Select “Extract” or “Unzip” to open the file. By doing this, the emails will be extracted and available on your machine.
Best wishes! Your Hotmail email export has been completed successfully. Now that you have access to them, you may securely keep them on your computer and make sure you don’t miss any crucial communications. You can feel happy knowing your digital correspondence is secure if you save your exported emails in a secure location.
Some Frequently Asked Questions About Hotmail Emails
1. How do I save a Hotmail email as a file?
Open the message you want to save, and on the File tab, click Save As. In the Save as dialog box, in the Folder pane, choose a folder, and then the location in that selected folder where you want to save the file. In the File name box, type a name for the file.
Conclusion
Exporting your Hotmail emails to protect them is a smart move that guarantees your critical digital communications are safe and always accessible. You can take control of your important data and feel at ease knowing that you can easily export your emails by following the simple instructions we’ve provided in this article.
Whether you’re switching to a new email service provider or just want a safe backup, following these easy steps helps you to protect your digital records and data. Thus, don’t be afraid to take the necessary actions to safeguard your Hotmail emails for many years to come. Many happy emails!